
A Tour of the Screen
Once you’re signed in, the Wasp Inventory screen has three main parts: the top bar across the top, the left navigation down the side, and the main content area in the middle. Here’s what each one does.
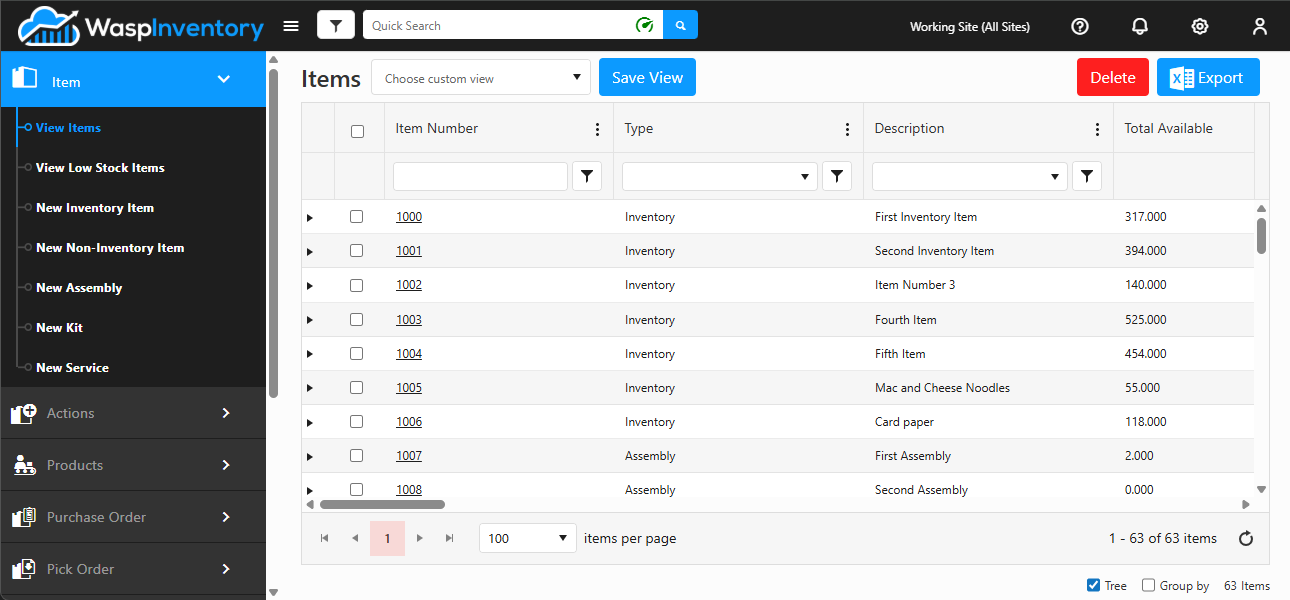
The top bar
Section titled “The top bar”The top bar stays with you on every page, keeping your settings and account always within reach.
- Logo — click the Wasp Inventory logo at the top-left to return to your item grid at any time. This can also be a custom logo, set from the Company Details page.
- Collapse button (☰) — click to narrow the left navigation for a wider working area, and click again to widen it back.
- Working Site — shows and switches the site (or All Sites) you’re currently working with.
- Wasp AI Assistant (sparkle icon) — opens the Wasp AI Assistant chat panel, for questions about your inventory data and how to use Wasp Inventory. See Wasp AI Assistant below.
- Help (?) — opens the help menu, with links to Help, About, Support, Getting Started, Product Tutorials, and What’s New. Help opens the help article for the screen you’re on, so you land on the page that explains what you’re looking at.
- Notifications (bell) — shows in-app alerts in a news feed; a badge appears when you have something new.
- Settings (gear) — opens configuration and setup options such as Company Details, Settings, Notifications, Units of Measure, Form Customization, Manage Views, and Import Data.
- Profile — click your name to open Edit Profile, choose a Theme, Change Password, or Log Off.
Wasp AI Assistant
Section titled “Wasp AI Assistant”Wasp AI Assistant lets you ask questions in plain language and get answers from your own inventory data or from this help site, without leaving the page you’re on.
Open the chat
Section titled “Open the chat”Click the sparkle icon in the top bar, next to the Working Site. The Wasp AI Assistant panel opens beside the page, and you can keep working on the page behind it. Type your question in the box at the bottom and press Enter or click Send. If you don’t know where to start, click one of the Try asking examples in the panel; click the pencil to edit an example before you send it.
Use the buttons in the panel’s header to read About This Assistant, Expand the panel to a larger view (and Restore it), or Close it. Your conversation stays put while you move between pages, so you can close the panel and pick up where you left off.
What you can ask
Section titled “What you can ask”Wasp AI Assistant answers two kinds of questions:
- Questions about your inventory data. Ask about your items, stock levels, orders, transactions, customers, and vendors, for example “Show me all items below min stock levels” or “How many open pick orders do I have?” It can filter, sort, and total records, and find items by lot, serial number, or date code.
- How-to questions about Wasp Inventory. Ask things like “How do I set up minimum stock levels?” or “What is the difference between a kit and an assembly?” Wasp AI Assistant answers from the articles on this help site and links to the articles it used, so you can read the full steps.
Wasp AI Assistant only reads data. It can’t add, change, or delete anything. It also sees only what you can: it looks things up as you, with your sign-in and site permissions.
Work with the answers
Section titled “Work with the answers”- Links to records. When an answer names an order, item, customer, vendor, site, location, or manufacturer, the name is often a link. Click it to open that record.
- Previews and spreadsheets. When your question returns a list, Wasp AI Assistant shows a preview of the first rows (click Show 7 More to see the rest of the preview). Click Download Spreadsheet to get every matching row as an Excel file.
- Check before you act. Answers are generated by AI and can be wrong or incomplete. Check that Wasp AI Assistant searched for what you meant, and confirm any figure you plan to act on against the matching page or report. If the answer missed, rephrase your question or add detail.
- Stop an answer. While an answer is being prepared, the send button becomes Stop. Click it if you want to ask something else instead.
Rate an answer
Section titled “Rate an answer”Under each answer are thumbs-up (Helpful) and thumbs-down (Not helpful) buttons. Pick one, add a comment if you like, and click Send feedback. Your feedback helps us improve Wasp AI Assistant.
Start a new chat
Section titled “Start a new chat”Wasp AI Assistant remembers the conversation so far, so you can ask follow-up questions. When you want to change topics, click New Chat at the bottom of the panel to clear the conversation and start fresh.
Questions about safety and privacy
Section titled “Questions about safety and privacy”Can Wasp AI Assistant change my data?
No. It only reads data. It can’t add, change, or delete anything in Wasp Inventory.
Can it show me data I’m not allowed to see?
No. It looks things up as you, with your sign-in, role, and site permissions, so its answers and spreadsheets include only records you could already see on the matching pages.
Questions about limits
Section titled “Questions about limits”How many questions can I ask?
Each user has a monthly quota of questions. The count resets at the start of each month. When you reach your quota, Wasp AI Assistant tells you when it resets. Every question you send counts, including questions you stop and questions it can’t answer.
How many rows can I get?
The preview shows up to 10 rows. Download Spreadsheet includes every matching row, up to the 1,048,576 rows an Excel worksheet can hold. If your results are larger than that, add a filter, such as a date range, site, or status, and download again.
The left navigation
Section titled “The left navigation”The left navigation groups the app into sections. Click a section to expand it and reveal its pages.
- Item — view, search, and create the products you track (including low-stock items and the change log).
- Actions — everyday stock transactions: Add, Remove, Adjust, Move, Check Out, Check In, plus History and Archived Transactions.
- Products — build and take apart made-to-order items: Build Orders, AutoBuild, and Disassemble.
- Purchase Order — order stock from vendors and Receive shipments.
- Pick Order — create pick orders and Pick items for customers.
- Lookups — the reference lists everything else is built on: Sites, Locations, Zones, Categories, Pay Methods, Vendors, Manufacturers, Customers, Shipping Providers, and Adjust Reason.
- Audits — count and reconcile stock: Audit Window, Audit, and Reconcile.
- Reports — Reports, Scheduled Report, Labels, and Receipts.
- Manage — set up Users and Roles.
- Mobility — mobile device setup and error logs.
The main content area
Section titled “The main content area”The center of the screen is where the work happens. Most pages show your data in a grid: a table of rows you can sort and filter.
- Column filters — click a column heading’s filter control to narrow the list to just the rows you want.
- Tree view — group related rows into an expandable, collapsible outline.
- Group by — organize rows into sections by a field you choose.
- Item count — a running total shows how many rows match your current view, so you always know how much you’re looking at.
Troubleshooting
Section titled “Troubleshooting”- A section or page is missing from the left navigation. You only see what your role and edition allow. If you expect a section that isn’t there, ask your administrator to check your role’s permissions.
- My data doesn’t look right. Confirm the Working Site in the top bar: the grid only shows the site (or All Sites) you’re currently working with. See Choose your Working Site.
- The grid is filtered and I can’t find an item. A column filter may still be applied from earlier. Clear your column filters to see the full list again.
- The left navigation is too narrow. You may have collapsed it: click the collapse button (☰) in the top bar to widen it back.